
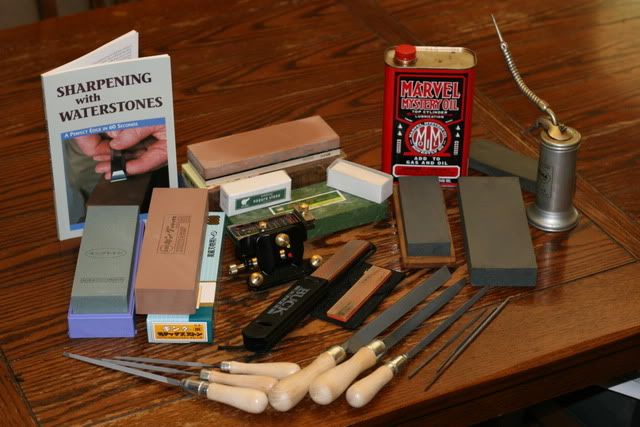
You’ll notice the pile split down the middle, Wet stones (Water) on the left and Oil on the right and some added goodies at the bottom. Most of the larger work (take the axes for example, get done with the oil stones) and the most precise work and fine edges (like plane blades, Knives, Chisels) is done with the Wet stones. Most of the reasoning for this is the grit selections that I have.
First, I’m very new to Wet/Water stones and decided a book was a good way to start… Seems very informative and I’ve already put a scalpel edge on my Kitchen knives with these Japanese stones. All are natural except the nagura stone which we’ll get to in a minute. The Japanese stones, from left to right are the blue 220 grit, followed by the first brown one that is an 800 grit. In the way back, you see a two tone stone…. This one is a 1200 and an amazing 8000… The 8000 feels like a glass and essentially polishes the edge to a mirror. This is where the small white Nagura stone comes into play… its used on the 8000 to create a milky slurry on the stone for polishing because the 8000 will not do it on its own… needs a little help. Using the wet stones is definitely a process that requires some time, for example, the stones must be submerged in water 20-30 minutes before use.. so it’s not something that you can just pickup and do… requires some planning but you will absolutely be blown away by the edge that you get. It would be difficult to imagine something getting any sharper than when you go through those stones all the way to the 8000 and you can see your reflection in the cutting edge.
Below these Wet stones is a Veritas Honing guide which I haven’t used yet but will be critical for putting that exact bevel angle on the plane blades as well as the chisels. Under the Honing guide is a set of diamond sharpeners good for keeping in the pack with the hunting/pocket knives… They are great for the field because they are small, light, have two grit choices and work perfectly on their own.
On the right hand side of the picture, you will see a selection of stones that I use most often with the oil pictured… this is great for hatchets or axes and heavy woodworking tools… Little drop of oil on the stone and you are off and running. On the very bottom of the picture is a collection of files specifically designed for sharpening saws… The largest files were used to put a new edge on the Timber saws from one of the earlier episodes J with the smallest being used for standard saws of various teeth counts. On the far right are round files used specifically for chain saw blades. I’m sure electric sharpeners work great but you will not always have power in the location where you are cutting wood, so learning by hand is the fail-safe way of keeping your chainsaw running safely.
Unfortunately this brings us to the end of the “Woodworking with Harry” series unless someone has an idea… Not sure If I have a specific tool that you are interested in but I may, so please ask and I’d be more than happy to share.
![Reblog this post [with Zemanta]](http://img.zemanta.com/reblog_e.png?x-id=2e3eca8a-90f4-4b23-88d5-70e34e4a0437)
No comments:
Post a Comment